

You may have been thinking about projects to build that solve real-world problems. You are about to build one.
Imagine traveling a long distance to reach a city, only to discover upon arrival that it's raining. This unexpected rain prevents you from carrying out the purpose of your journey. It's disheartening, considering the time, energy, and resources you invested.
Now, envision a different scenario where you plan to travel to a city and desire to know the weather in advance. However, instead of using just any app, you have the joy of checking the weather using an app you created yourself. That's a great feeling, isn't it?
In this article, you will learn how to create a simple weather app using HTML5, CSS3, and Vanilla JavaScript. You will use HTML5 for the markup and CSS3 to enhance the user interface's (UI) appearance. With JavaScript, you will access specified city weather data through a third-party Application Programming Interface (API) and display it on the UI.
Requirements for This Project
Basic understanding of HTML and CSS (having previously designed at least one webpage)
Basic knowledge of JavaScript
A code editor, preferably VS Code.
A browser, preferably Chrome.
What Are We Building?
Our objective is to develop a weather app that offers users real-time weather information for any city name they input. The main purpose is to provide current weather conditions and related data to assist users in planning their activities accordingly.

This project will be divided into three sections:
Defining the Markup with HTML
Enhancing the UI with CSS
Lastly, retrieving the weather data for a specified city from a third-party API and displaying the data on the UI using JavaScript
Defining the Markup
Whenever I design a page, I have a habit of creating a mental picture of different parts of the project before writing any code in the text editor. I will be applying the same approach to this project as well.
When you take a look at the image below, you'll see that I've divided the body of the application into four parts.

Before we move on to the body, let's start by discussing the head section. In the HTML code provided below, you can observe that it consists of both the head and the body.
<!DOCTYPE html>
<html lang="en">

<!--THE HEAD-->
  <head>
    <meta charset="UTF-8" />
    <meta http-equiv="X-UA-Compatible" content="IE=edge" />
    <meta name="viewport" content="width=device-width, initial-scale=1.0" />
    <title>Weather App</title>
    <link rel="stylesheet" href="style.css" />
  </head>

<!-- THE BODY -->
  <body>
    <div class="container">
      <h1>Weather App</h1>
      <form>
        <input type="text" id="city-input" placeholder="Enter City" />
        <button>Get Weather</button>
      </form>
      <div id="weather-data">
        <div class="weather-icon" id="weather-icon">
          <img
            src="http://openweathermap.org/img/wn/04d.png"
            alt="Weather-Icon"
          />
        </div>
        <div class="temperature" id="temperature">23°C</div>
        <div class="weather-description" id="weather-description">
          overcast clouds
        </div>
        <div class="weather-details" id="weather-details">
          <div id="feels-like">Feels like: 24°C</div>
          <div id="humidity">Humidity: 97%</div>
          <div id="wind-speed">Wind speed: 0.41m/s</div>
        </div>
    </div>
    <script src="script.js"></script>
  </body>
</html>
The Head Section
The head contains important information about the webpage, including character encoding, compatibility settings, and instructions for displaying the page on various devices.
It also includes the title, which is set to Weather App and appears in the browser's title bar. Additionally, there is a link to a separate file called style.css, enabling the application of styles to the HTML elements on the page.
<head>
    <meta charset="UTF-8" />
    <meta http-equiv="X-UA-Compatible" content="IE=edge" />
    <meta name="viewport" content="width=device-width, initial-scale=1.0" />
    <title>Weather App</title>
    <link rel="stylesheet" href="style.css" />
  </head>
The Body Section
It contains the visible content of the web page. The body section has these parts:
The Container Div: This is like a box that wraps around everything in the app.
Heading: An h1 heading that displays the text Weather App as the title of the app.
Form: This contains the input field which allows users to type the city they want to get its weather information. It also contains a Get Weather button which, when clicked, retrieves the weather information from an API.
Weather Data Div: It is a container for the weather information to be displayed dynamically. It contains the weather icon div, which has an image element that shows the weather icon corresponding to the current weather conditions. It also contains both the temperature and weather description divs, which show the current temperature and a brief description of the weather conditions, respectively.
Weather Details Div: This is also a container div that wraps other divs like
feels-like,humidity, andwind-speed. These divs display additional weather details of the city.Script Tag: It links an external JavaScript file called script.js to the document, allowing for dynamic functionality and interactivity.
<body>
    <div class="container">
      <h1>Weather App</h1>
      <form>
        <input type="text" id="city-input" placeholder="Enter City" />
        <button>Get Weather</button>
      </form>
      <div id="weather-data">
        <div class="weather-icon" id="weather-icon">
          <img
            src="http://openweathermap.org/img/wn/04d.png"
            alt="Weather-Icon"
          />
        </div>
        <div class="temperature" id="temperature">23°C</div>
        <div class="weather-description" id="weather-description">
          overcast clouds
        </div>
        <div class="weather-details" id="weather-details">
          <div id="feels-like">Feels like: 24°C</div>
          <div id="humidity">Humidity: 97%</div>
          <div id="wind-speed">Wind speed: 0.41m/s</div>
        </div>
    </div>
    <script src="script.js"></script>
  </body>
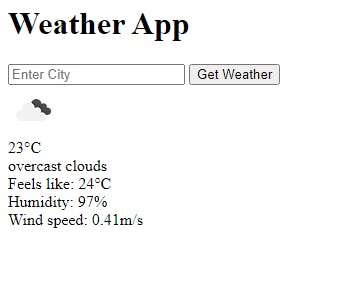
Note: You will notice that in the HTML code, I used both classes and IDs. The classes will be used for styling the elements, and IDs for DOM manipulation using JavaScript.
When you implement the HTML code provided, you will get the image below.
Enhancing the UI With CSS
Yes, I am aware that the UI appears strange with only the HTML. Now it's time to make it attractive by using CSS.
Before we start styling, we will set a universal style reset for all elements, removing padding and margin and using the border-box box-sizing model.
* {
  padding: 0;
  margin: 0;
  box-sizing: border-box;
}
Body Styling: Sets the background-color and font-family for the entire document.
body {
  font-family: "Courier New", Courier, monospace;
  background-color: #292626;
}
Container Styling: Defines the appearance of the main container div, including its background-color, box-shadow, dimensions, border-radius, margin, and padding.
.container {
  background-color: #fff;
  box-shadow: 0 0 rgba(0, 0, 0, 0.2);
  text-align: center;
  max-width: 600px;
  margin: 0 auto;
  margin-top: 50px;
  border-radius: 5px;
  padding: 20px;
}
Form Styling: Configures the form's layout using flexbox, aligning its elements and adding margin.
form {
  display: flex;
  justify-content: center;
  align-items: center;
  margin-bottom: 20px;
}
Input Field and Button Styling: Defines the appearance of the input field and button within the form, including the border, padding, background-color, and hover effects.
form input[type="text"] {
  border: none;
  border-radius: 5px;
  outline: none;
  font-size: 16px;
  padding: 10px;
  width: 60%;
  background-color: #f1f1f1;
}

button {
  background-color: #29262669;
  color: #fff;
  border: none;
  border-radius: 8px;
  outline: none;
  padding: 10px 20px;
  font-size: 15px;
  cursor: pointer;
  transition: background-color 0.3s ease;
}

button:hover {
  background-color: #292626;
}
Weather Icon Styling: Sets the size and positioning of the weather icon image.
.weather-icon img {
  width: 100px;
  height: 100px;
  background-size: contain;
  background-repeat: no-repeat;
  background-position: center center;
}
Temperature and Weather Description Styling: Defines the appearance of the temperature and weather description divs, including font-size, margin, and font-weight.
.temperature {
  font-size: 40px;
  margin: 20px 0;
  font-weight: 900;
}

.weather-description {
  font-size: 24px;
  margin-bottom: 20px;
}
Weather Details Styling: Configures the layout and appearance of the weather details container using flexbox, aligning the elements and allowing them to wrap onto multiple lines.
.weather-details {
  display: flex;
  justify-content: center;
  align-items: center;
  flex-wrap: wrap;
}
Individual Weather Detail Styling: Styles each weather detail div within the weather details container, setting padding, background-color, margin, border-radius, text alignment, and minimum height.
.weather-details > div {
  padding: 20px;
  background-color: #f1f1f1;
  margin: 10px;
  flex: 1;
  border-radius: 5px;
  text-align: center;
  min-height: 45px;
}
Media Query: Adjust the form layout for screens with a maximum width of 768 pixels, stacking the elements vertically.
@media (max-width: 768px) {
  form {
    flex-direction: column;
  }

  form input[type="text"] {
    width: 100%;
    margin-bottom: 10px;
  }
}
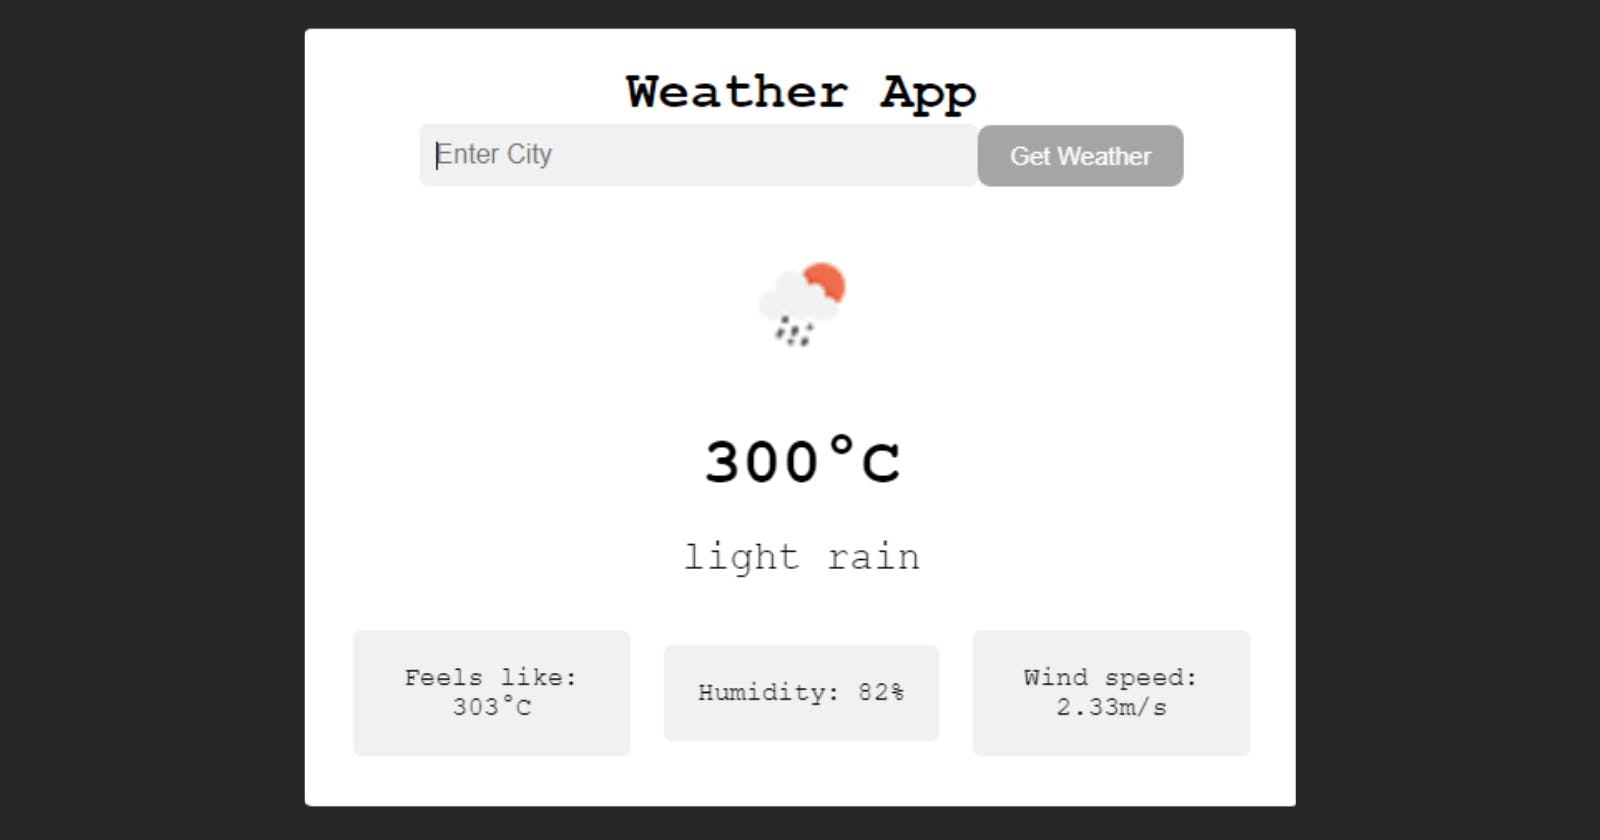
The provided CSS code styles the weather app interface and matches the original design, as shown in the image below.
Working with JavaScript
Maybe it's time to make yourself a cup of coffee or take a quick 5-minute break.
This is a very interesting section. Working with JavaScript is fun because it lets you do cool things on the web. It's especially exciting when you can fetch data from a third-party API using JavaScript.
When working with JavaScript, I always ask myself two questions:
What actions does the user need to perform?
What functions does the app need to perform?
By answering these questions, we would have done some part of the work.
What actions does the user need to perform?
Enter the city for which they want weather information in the input box.
Click the Get Weather button.
What functions does the app need to perform?
Capture the city name from the input box.
Retrieve the weather information of that city from an API.
Render (display) the gathered information on the UI.
By knowing the answers to these questions, I assume you have started thinking about how to implement these functionalities.
OpenWeatherMap API
Before we go on to implement these functionalities, let’s talk about API and the third-party API that we will use known as OpenWeatherMap API.
An API, short for Application Programming Interface, acts as a messenger, enabling different software applications to talk to each other and exchange information or perform certain actions.
For our application, we will use the OpenWeatherMap API. It is a service that provides developers with access to weather data worldwide. It allows developers to fetch current conditions, forecasts, and historical data by making API requests. The API requires an API key for authentication and offers various features such as weather maps and air pollution data. It enables developers to integrate accurate weather information into their applications and websites.
Without an API key, it is impossible to access data from OpenWeatherMap. To obtain an API key, you must have an account with them. If you already have an account, you can go ahead and copy your API key. If you do not have an account, we are about to create one together.
Step-By-Step Process for Creating an Account and Obtaining an API Key With OpenWeatherMap
Step 1: Visit the OpenWeatherMap website.
Step 2: Sign Up by filling in the required information in the registration form, including your email address, username, and password. You can also choose to sign up using your existing Google, Facebook, or GitHub account.
After filling in the necessary details, click on the Create button to create your account.
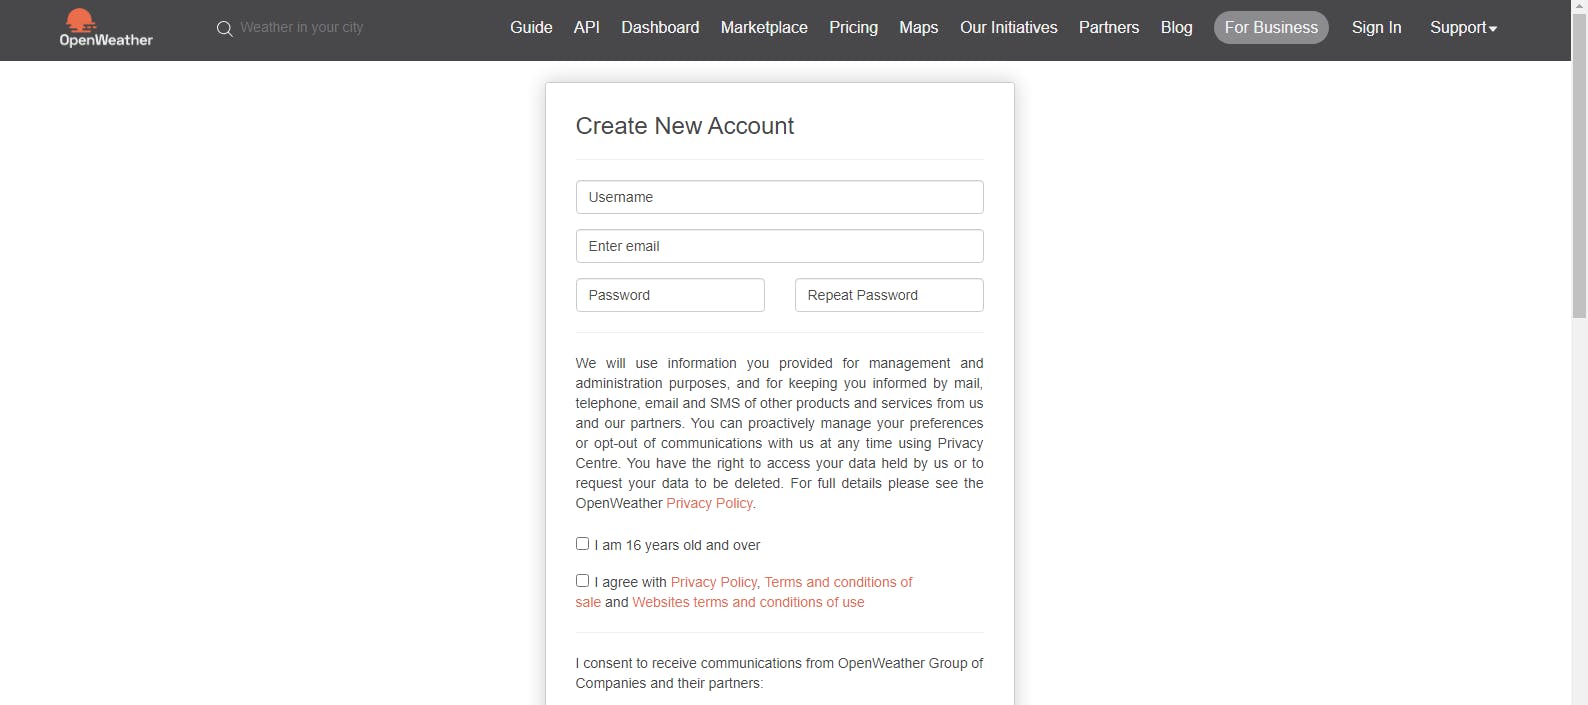
Step 3: You will receive a verification email. Go to your email inbox and click on the verification link to confirm your account.
Step 4: Once your account is confirmed, go back to the OpenWeatherMap website and log in using your details.
Step 5: After logging in, navigate to the API Keys page, which can be found at the top-right menu.
Step 6: On the API Keys page, click on the Create Key button to generate a new API key. You may need to provide additional information, such as the purpose or name of the project using the API key.

Step 7: Once the API key is generated, copy and securely store it. The API key serves as a unique identifier and is required to authenticate your API requests.
It may take some time before the API key gets activated. This means you will have to wait for some time before you can use it, maybe an hour.
JavaScript Section
First, we begin by declaring our variables. After that, we'll attach an event listener to the form that detects when it's submitted. Lastly, we move on to writing our functions.
Variables
In this part, there's not much to explain. I created a constant variable called "apiKey" and assigned it the API key. Just remember, you must have the API key to access weather data from the OpenWeatherMap API.
Let me break down the code below. It creates variables and selects specific elements from the HTML using their IDs. These elements consist of the city input field and the form that lets you submit the city in the input box.
The weatherIconEl, temperatureEl, weatherDescriptionEl, feelsLikeEl, humidityEl, and windSpeedEl represent various HTML elements for displaying weather data.
Also, the weatherDataEl represents the container div with the id weather-data for displaying weather information.
//VARIABLES
const apiKey = "42039962d373fcc51d2f9970b8******"; //Your API key
const cityInputEl = document.getElementById("city-input");
const formEl = document.querySelector("form");
const weatherIconEl = document.getElementById("weather-icon");
const temperatureEl = document.getElementById("temperature");
const weatherDescriptionEl = document.getElementById("weather-description");
const feelsLikeEl = document.getElementById("feels-like");
const humidityEl = document.getElementById("humidity");
const windSpeedEl = document.getElementById("wind-speed");
const weatherDataEl = document.getElementById("weather-data");
let cityName = "";
Adding an Event Listener
To ensure that the weather information for the city in the input box is displayed on the UI every time we click the Get Weather button, we need to add an event listener to the form.
This code attaches the event listener to the form element, and it will trigger the renderCityWeatherData function when the form is submitted.
formEl.addEventListener("submit", renderCityWeatherData);
Creating Our Different Functions
The renderCityWeatherData function is triggered when the form is submitted. It stops the default form submission behavior, captures the city name entered by the user, and then calls the getCityWeatherData function with that city name.
In summary, we'll create two functions: one to get the city name from the input field and another to fetch the weather data for that specific city.
function renderCityWeatherData(event) {
  event.preventDefault();

  getCityName();

  getCityWeatherData(cityName);
}
The getCityName function retrieves the city name from the input field and stores it in a variable.
function getCityName() {
  cityName = cityInputEl.value;
}
Performing the AJAX Request
Now, let's proceed with making the AJAX request.
In the getCityWeatherData function:
Now that we have the city name from the input box using the getCityName function, we can fetch the city's weather information using the OpenWeatherMap API.
For this, we will use async and await with AJAX requests, which enables writing asynchronous code, making it easier to manage responses and work with the data retrieved from the server.
Each API has an endpoint, and the OpenWeatherMap API is no exception. We'll construct the URL following the API documentation, which includes the city name and the API key: https://api.openweathermap.org/data/2.5/weather?q=${cityName}&appid=${apiKey}.
First, we create a variable called
urlto store the API request URL. Then, we make the AJAX request using thefetch()method and useawaitto pause the execution until we receive the data.After getting the response, we check if it contains an error by verifying the
response.okproperty. If there's no error, we extract the JSON data usingawait response.json()and save it in thedatavariable. This data includes the information returned from the API, like weather details.

We then call the
displayCityWeatherData(data)function, passing the weather data as an argument. This function handles and presents the weather data to the user.If there's an error during the execution, such as an incorrect city name, the code jumps to the
catchblock. The error message is captured in theerrorparameter and displayed to the user using thedisplayErrorMessage(error.message)function.
async function getCityWeatherData(cityName) {
const url = `https://api.openweathermap.org/data/2.5/weather?q=${cityName}&appid=${apiKey}`;
try {
const response = await fetch(url);
if (!response.ok) {
throw new Error(
"Please ensure that you have entered a correct city name. 🤦♀️"
);
}
const data = await response.json();
displayCityWeatherData(data);
} catch (error) {
displayErrorMessage(error.message);
}
}
The displayCityWeatherData Function:
It presents important information to users. It extracts details like temperature, humidity, and weather conditions, giving users a comprehensive overview of the current weather in their chosen city.
Using template literals, the function updates the app's UI with this data, creating a user-friendly display.
function displayCityWeatherData(data) {
  const weatherIcon = data.weather[0].icon;
  const temperature = Math.round(data.main.temp);
  const weatherDescription = data.weather[0].description;
  const feelsLike = Math.round(data.main.feels_like);
  const humidity = data.main.humidity;
  const windSpeed = data.wind.speed;


  weatherDataEl.innerHTML = `<div class="weather-icon" id="weather-icon">
    <img
      src="http://openweathermap.org/img/wn/${weatherIcon}.png"
      alt="Weather-Icon"
    />
  </div>
  <div class="temperature" id="temperature">${temperature}°C</div>
  <div class="weather-description" id="weather-description">
    ${weatherDescription}
  </div>
  <div class="weather-details" id="weather-details">
    <div id="feels-like">Feels like: ${feelsLike}°C</div>
    <div id="humidity">Humidity: ${humidity}%</div>
    <div id="wind-speed">Wind speed: ${windSpeed}m/s</div>
  </div>`;
}
The displayErrorMessage Function:
If there are any problems while fetching data, the app displays error messages. By showing these messages on the app's interface, users are informed about any issues that occurred.
function displayErrorMessage(message) {
  weatherDataEl.innerHTML = `<div class="error-message">${message}</div>`;
}
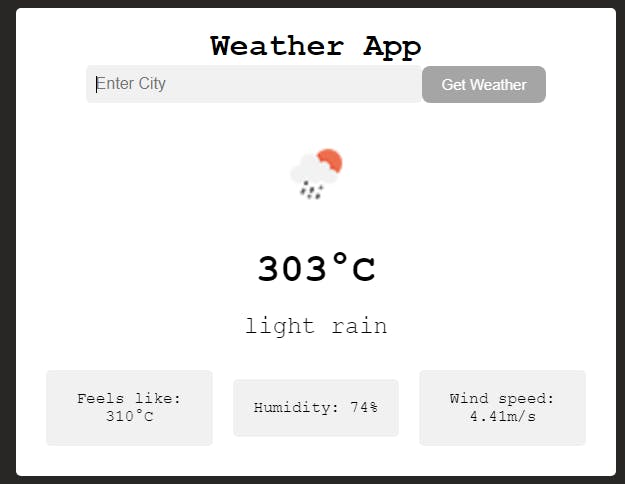
Below is the complete JavaScript code we wrote for our weather app.
const cityInputEl = document.getElementById("city-input");
const formEl = document.querySelector("form");
const weatherIconEl = document.getElementById("weather-icon");
const temperatureEl = document.getElementById("temperature");
const weatherDescriptionEl = document.getElementById("weather-description");
const feelsLikeEl = document.getElementById("feels-like");
const humidityEl = document.getElementById("humidity");
const windSpeedEl = document.getElementById("wind-speed");
const apiKey = "42039962d373fcc51d2f9970b8175f4c";
const weatherDataEl = document.getElementById("weather-data");
let cityName = "";
formEl.addEventListener("submit", renderCityWeatherData);
function renderCityWeatherData(event) {
event.preventDefault();
getCityName();
getCityWeatherData(cityName);
}
function getCityName() {
cityName = cityInputEl.value;
}
async function getCityWeatherData(cityName) {
const url = `https://api.openweathermap.org/data/2.5/weather?q=${cityName}&appid=${apiKey}`;
try {
const response = await fetch(url);
if (!response.ok) {
throw new Error(
"Please ensure that you have entered a correct city name. 🤦♀️"
);
}
const data = await response.json();
console.log(data);
displayCityWeatherData(data);
} catch (error) {
displayErrorMessage(error.message);
}
}
function displayCityWeatherData(data) {
const weatherIcon = data.weather[0].icon;
const temperature = Math.round(data.main.temp);
const weatherDescription = data.weather[0].description;
const feelsLike = Math.round(data.main.feels_like);
const humidity = data.main.humidity;
const windSpeed = data.wind.speed;
weatherDataEl.innerHTML = `<div class="weather-icon" id="weather-icon">
<img
src="http://openweathermap.org/img/wn/${weatherIcon}.png"
alt="Weather-Icon"
/>
</div>
<div class="temperature" id="temperature">${temperature}°C</div>
<div class="weather-description" id="weather-description">
${weatherDescription}
</div>
<div class="weather-details" id="weather-details">
<div id="feels-like">Feels like: ${feelsLike}°C</div>
<div id="humidity">Humidity: ${humidity}%</div>
<div id="wind-speed">Wind speed: ${windSpeed}m/s</div>
</div>`;
}
function displayErrorMessage(message) {
weatherDataEl.innerHTML = `<div class="error-message">${message}</div>`;
}
CONCLUSION
Congratulations on building your own weather app! You have learned HTML, CSS, and JavaScript and made it all work with an API. Keep going, keep coding, and keep learning.
References
Thank you for taking the time to read this article. If you found it helpful, please give it a ❤️ and share it with others. By sharing this article, we can help more people discover how to build their own weather app.
To stay updated with more web development content and exciting projects, feel free to follow me on Twitter, LinkedIn, and GitHub. Let's continue our coding journey together, and share insights.
I'm looking forward to connecting with you, and I'm here to support you in your coding journey.